
You can apply for an Indonesia visa online through the official e-Visa portal at evisa.imigrasi.go.id in about 15-20 minutes. The process involves creating an account, selecting your visa type, uploading documents, paying the fee, and receiving your approved e-Visa by email. This guide walks you through every step so you can complete your application without errors.
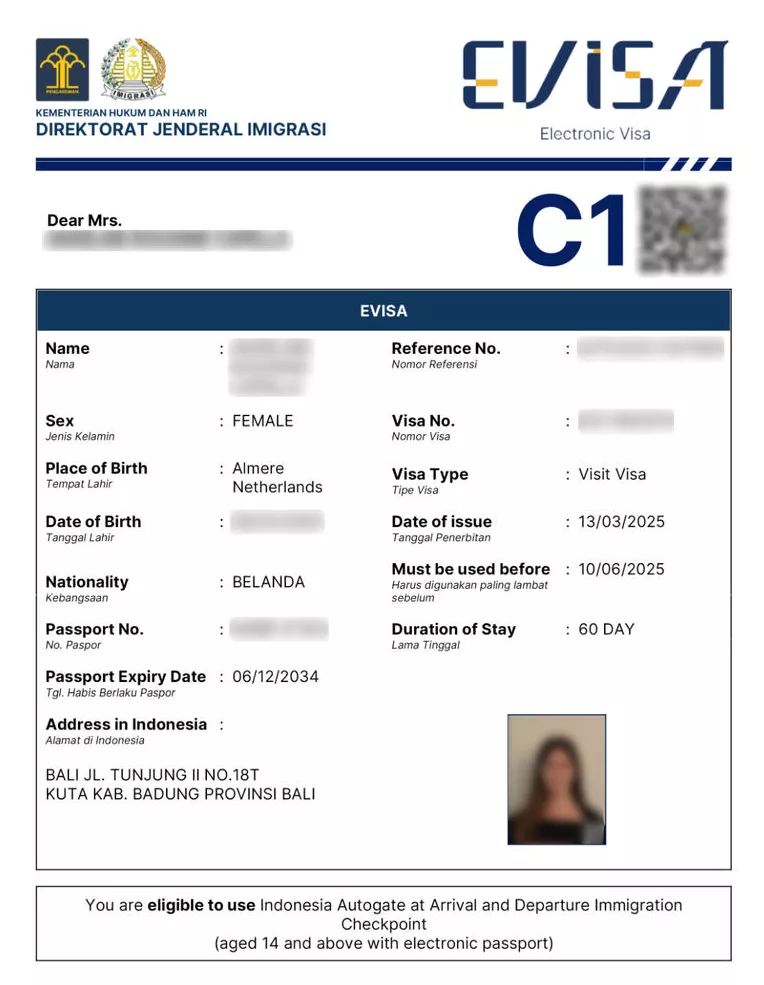
Indonesia offers several online visa options depending on your nationality and travel purpose. The most common are the e-Visa on Arrival (e-VoA) for short tourist stays and the C1 Visitor Visa for longer visits. Before you begin the application, it helps to understand which visa type fits your trip – you can read our complete guide to Indonesia visa types for a detailed breakdown.
Before You Start: What You Need
Gather these items before opening the application portal. Having everything ready prevents delays and reduces the chance of rejection.
Required Documents
| Document | Requirement | Notes |
|---|---|---|
| Valid passport | 6+ months remaining validity | Must have 1-2 blank pages |
| Passport photo | Recent, white background | Digital format (JPEG or PNG) |
| Passport data page scan | Clear, color scan | Must show all details clearly |
| Return/onward ticket | Confirmed booking | Shows intent to leave Indonesia |
| Proof of accommodation | Hotel booking or invitation letter | For the duration of your stay |
| Proof of funds | Bank statement or credit card | Shows ability to support yourself |
| Email address | Active, accessible | All communications go here |
| Payment card | Visa, Mastercard, or JCB | For paying the visa fee online |
Eligibility Check
Not all nationalities need to apply online. Citizens of certain countries can enter Indonesia visa-free for up to 30 days. Check our visa-free countries list to see if you qualify. If you need a visa, the online application is available to citizens of most countries worldwide.
Step-by-Step Application Process
Follow these five steps to complete your Indonesia visa application online. The entire process takes about 15-20 minutes if you have all documents ready.
Step 1: Create Your Account on the Official Portal
Go to evisa.imigrasi.go.id – this is the only official Indonesian e-Visa portal run by the Directorate General of Immigration.
- Click the “Register” or “Sign Up” button on the homepage
- Enter your email address (use one you check regularly)
- Create a strong password
- Verify your email address by clicking the confirmation link
- Log in with your new credentials
Important: Use a personal email you have ongoing access to. Your e-Visa approval and all updates will be sent to this address. Do not use a temporary or work email you might lose access to.
Step 2: Select Your Visa Type and Fill the Application
Once logged in, start a new application:
- Click “Apply for Visa” or “New Application”
- Select your visa category:
- e-Visa on Arrival (e-VoA): 30-day tourist stay, IDR 500,000 (~$35 USD)
- C1 Visitor Visa: 60-day stay for tourism or social visits, IDR 1,500,000 (~$95 USD)
- C2 Business Visa: Business meetings and conferences, IDR 1,500,000-2,000,000+
- Fill in your personal details exactly as they appear on your passport:
- Full name (as on passport)
- Date of birth
- Nationality
- Passport number
- Passport expiry date
- Enter your travel details:
- Planned arrival date
- Port of entry (airport or seaport)
- Accommodation address in Indonesia
- Answer all security and background questions honestly
Tip: Double-check every field against your passport. Even small spelling differences between your application and passport can cause delays or rejection.
Step 3: Upload Your Documents
The portal requires clear digital copies of your documents:
- Passport photo: Upload a recent passport-style photo (JPEG or PNG, typically under 2MB)
- Passport data page: Upload a color scan of the page with your photo and personal details
- Supporting documents: Depending on visa type, you may need to upload:
- Return flight ticket
- Hotel reservation
- Bank statement
- Invitation letter (for social/business visas)
Document requirements:
– Files must be clear and legible
– Accepted formats: JPEG, PNG, or PDF
– Maximum file size varies (usually 1-2MB per file)
– All text on documents must be readable
Step 4: Pay the Visa Fee
After uploading documents, you will see the payment page:
- Review your application summary
- Confirm the visa type and fee amount
- Enter your payment card details:
- Visa, Mastercard, or JCB credit/debit card
- Card must be enabled for international transactions
- Complete the payment
- Save your payment confirmation and application reference number
| Visa Type | Fee (IDR) | Fee (USD approx.) | Duration |
|---|---|---|---|
| e-Visa on Arrival (e-VoA) | IDR 500,000 | ~$35 | 30 days |
| C1 Visitor Visa | IDR 1,500,000 | ~$95 | 60 days |
| C2 Business Visa | IDR 1,500,000-2,000,000+ | ~$95-130+ | 60 days |
| D Multiple-Entry Visa | Varies | Varies | Up to 1 year |
Payment tips:
– Ensure your card is enabled for international online transactions
– If payment fails, wait a few minutes before retrying
– Some banks block overseas transactions – call your bank if needed
– Keep the transaction reference number for your records
For a complete breakdown of all visa fees, see our Indonesia visa fees guide.
Step 5: Receive and Download Your e-Visa
After successful payment:
- Your application enters processing (typically 1-5 business days)
- You will receive email notifications at each stage
- Once approved, log back into the portal to download your e-Visa
- Download and save the PDF approval letter
- Print a physical copy to carry during travel
Important: Your e-Visa is valid for 90 days from the date of issuance. You must enter Indonesia within this window. If your travel plans change, you may need to reapply. Check our guide on e-Visa processing time for more details.
Indonesia Visa Fees by Type
Understanding the fee structure helps you choose the right visa and budget for your trip:
| Visa Category | Fee | Stay Duration | Extendable? | Best For |
|---|---|---|---|---|
| e-VoA (B1) | IDR 500,000 | 30 days | Yes, once | Short tourist trips |
| C1 Visitor | IDR 1,500,000 | 60 days | Yes | Longer tourism, social visits |
| C2 Business | IDR 1,500,000+ | 60 days | Yes | Business meetings, conferences |
| D Multiple-Entry | Varies | Up to 1 year | N/A | Frequent travelers |
| B211A Social | Varies | 60 days | Yes, up to 4x | Social/cultural visits |
Processing Time and Status Tracking
Processing times depend on the visa type and your nationality:
| Visa Type | Typical Processing | Maximum |
|---|---|---|
| e-VoA | 1-3 business days | 5 business days |
| C1 Visitor | 3-5 business days | 7 business days |
| C2 Business | 3-5 business days | 10 business days |
| D Multiple-Entry | 5-10 business days | 14 business days |
To check your application status:
1. Log in to evisa.imigrasi.go.id
2. Go to “My Applications” or “Application Status”
3. Find your application by reference number
4. View current status: Submitted, Under Review, Approved, or Rejected
Common Mistakes and How to Avoid Them
Avoid these frequent errors that cause delays or rejections:
| Mistake | Why It’s a Problem | How to Avoid |
|---|---|---|
| Passport validity under 6 months | Automatic rejection | Check expiry before applying |
| Blurry document scans | Application put on hold | Use good lighting, flat surface |
| Name mismatch (passport vs application) | Processing delays | Copy name exactly from passport |
| Wrong visa type selected | Wrong fee, wrong permissions | Read visa type descriptions carefully |
| Payment card not enabled for international | Payment fails | Call bank to enable before applying |
| Using expired email address | Miss approval notifications | Use active personal email |
| Applying too late | e-Visa expires before travel | Apply at least 2 weeks before departure |
What to Do After Your Visa Is Approved
Once you receive your approved e-Visa, complete these steps before your trip:
- Download and print your e-Visa approval letter (PDF)
- Verify all details – name, passport number, dates, visa type
- Save a digital copy on your phone as backup
- Check entry requirements – some ports of entry may have additional requirements
- Prepare arrival documents – passport, printed e-Visa, return ticket, accommodation proof
- Complete the customs declaration online before arrival (if required)
FAQs About Applying for an Indonesia Visa Online
Can I apply for an Indonesia visa on behalf of someone else?
Yes, you can apply for family members or travel companions. You will need their passport details and documents. Each person needs a separate application with their own email address for receiving notifications.
What if my Indonesia visa application is rejected?
You can reapply after addressing the rejection reason. Common reasons include insufficient documents, passport validity issues, or incorrect information. Check our guide on application rejection reasons for detailed solutions.
Do I need to print my e-Visa or is a digital copy enough?
We strongly recommend carrying a printed copy. While some airlines and immigration officers accept digital copies on your phone, a printed version ensures you are prepared if technology fails or if an officer requires a physical copy.
How early should I apply before my trip?
Apply at least 2-4 weeks before your departure date. The e-Visa is valid for 90 days from issuance, so applying early gives you buffer time if processing takes longer than expected or if you need to correct any issues.
Can I extend my e-Visa on Arrival in Indonesia?
Yes, the e-VoA can be extended once for an additional 30 days. You must apply for the extension at a local immigration office in Indonesia before your current visa expires. There is an additional fee for the extension.
What payment methods are accepted for the Indonesia e-Visa?
The official portal accepts Visa, Mastercard, and JCB credit or debit cards. The card must be enabled for international online transactions. Some local payment options may also be available depending on your country.
Is the e-Visa on Arrival the same as a regular Visa on Arrival?
No. The e-VoA is applied for online before travel and gives you pre-approved entry. The regular Visa on Arrival (VoA) is obtained at the airport upon arrival. The e-VoA is faster at immigration since you skip the on-arrival queue.
Can I change my visa type after applying?
No, you cannot change visa types after submission. If you selected the wrong type, you would need to submit a new application (and pay the fee again). Double-check your selection before proceeding to payment.
What happens if my passport expires while my e-Visa is still valid?
Your e-Visa becomes invalid if your passport expires. You must have at least 6 months validity remaining on your passport from your date of entry into Indonesia. If your passport is expiring soon, renew it before applying.
Do children and infants need a separate e-Visa application?
Yes, every traveler including children and infants needs their own e-Visa application with their own passport. Parents or guardians can submit applications on behalf of their children using the child’s passport details.